A to Z Challenge
F = FRANKEN PAPER
 |
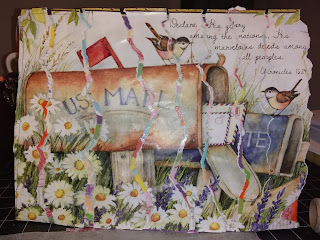
| Franken Page I made a few years ago |
Today's
letter is "F" and that means Franken Paper.
Have
you heard of “Franken Paper”? It is a technique where you glue or stitch
random scraps of paper together to create new papers, tags. pockets etc.
This has always been a dilemma for
me as well as several conversations with other crafters. When is a piece of
paper too small to keep and too big to throw away? As I mentioned above, you
can coordinate scrap papers to create new papers, tags, and pockets. Use them
to make tuck spots or to even layer other projects.
Any time I work with Mod Podge or
other wet adhesives, I place a piece of wax paper down across my desk. I
grabbed my wax paper today and I'm ready to start creating Franken
Papers.
I gathered the rest of the items I
needed. Several paint brushes in various sizes (just in case I need them). Mod
Podge. Scrap papers. I always have the wax paper underneath the
paintbrushes.
Next, what I do, is roughly make an
outline for the size of the page I want to create. (You don't have to do this
step). I outline a rough area with a sharpie - this way I know the exact space
I am going to be working in. I'll let the papers go over the edge just a tad,
then trim them down if necessary, once everything has completely dried.
Franken pages are easy and if you are curious, there are YouTube videos that will show you how to make them. Honestly, just gather your scraps and start piecing them together.
There will be two sides as you make
your page. I like using double-sided papers if they are in my scraps, but you
don't necessarily have to have them. The only thing I've found when using
double-sided papers is sometimes the images will be upside down. That's why I
work front and back at the same simultaneously.
The images above show the progression of the front and back as I am piecing the scrap pieces together.
I continue tearing and gluing pieces
of paper, layering some of the pieces. Flipping and doing the same thing over
on the opposite side. I like building my outer edges first because then I can
color coordinate papers if I want. (kind of like putting a jigsaw puzzle
together).
Flip it over, glue a few pieces, and turn
it back over. Repeat as many as times necessary.

I continue to work, flipping
over and over. Putting papers here and putting pieces there. I tuck papers up
under other papers, flip it back over and do the same on the other side.
I make sure there aren't any
holes that need to be covered as I get closer to being finished with the page.
Right now, it's just scraps papers on top of one another with no design, rhyme
or reason.
Remember, you can use larger pieces
and sew them onto your page. It's your creation. Create it how you envision it.
They can be cohesive, and they can look like a mess. Kind of like this one
does. I could stop here if I wanted and add some words, some stamped images, or
use a photograph. But I have something else in mind.
I collect old calendars to use in my crafting projects. I'm going to finish out the front side with a page from an old calendar. I haven't trimmed the edges down yet and honestly, I kind of like how they look.
 |
| The finished Franken Page using an old Calendar This IS the front side |
I'm not finished yet. But you will
see, I took some of the pieces from the calendar and incorporated them into the
backside. I'm going to pull this page together with some more with a few other
things. I haven't decided what yet...to be determined. As you see, making
Franken Pages is very easy and this would be a fun and exciting project for
both children, teens, and adults alike.
 |
| the backside of the Franken Page |

This swap with Franken Papers was a
themed one. We had to use green and yellow papers and make embellishments for
the pages. I made an altered paper clip using a butterfly and as you can see in
the circled photo, I incorporated the recipient's name into the paper.
In closing, here is one that was sent
to a friend of mine. It's in a Christmas theme. As you see in the
photograph, the creator incorporated bling along the outside edge.
So, you see, Franken Pages can be made in any way, shape, color, or, a theme you can imagine. Let's make some Franken Papers! Grab your scrap papers, glue, and a paintbrush...what are you waiting for?
Heart to Heart Soul
Creations
H2hsc2020


I have tons of scrap pieces of paper in my craft room. This seems like the perfect project to try. Weekends In Maine
ReplyDeleteHello Weekends in Maine!
ReplyDeleteThanks for reading and sharing a comment. It's funny how scrap pieces seem to multiply, isn't!? There are so many things a person can do with them...but I usually head to a new paper pad. LOL
My post today will be sharing Glue books and maybe I need to start using my scrap paper pieces in them as well.
Have fun creating your Franken Paper and shoot me a picture/pictures when you are finished. Would love to see them!!
BTW, what kind of crafter are you? Paper, journal, mixed media, altered art?
Have a GREAT day!
H2hsc2020
Oh, I'm definitely going to try this! I think only people who love to work with paper understand how hard it is to throw out scraps, no matter how small!
ReplyDelete